

 Cameron Summerson
While nothing can replace a good bike mechanic, there’s a lot of regular maintenance and bike repair you can do yourself at home. If you’re just getting started, however, it can be daunting to know what you really need.
Update, 9/14/22: Checked content for accuracy, product availability, and dead links. Removed or replaced eight discontinued products.
Bikes are weird because there are a lot of specialized tools for working on them—especially for some of the more niche parts. And since those tools are very specific, they’re also costly. The good news is you don’t have to spend a ton of money to do most of what your bike needs on the regular. Here’s everything you need—from tools to lubes—to make sure your bike always runs like a top.
Tools: The Necessities
A Work Stand
Hex Keys and Torque Wrenches
A Good Tape Measure
A Pump
More Necessities: Lubes, Degreaser, and Bike Wash
Chain Lubes
Degreasers
A Chain Cleaning Tool
Bike Wash
General Greases and Lubricants
Rags and Gloves
The Niche Stuff That Comes in Handy
Tools: The Necessities
When it comes to bike maintenance, there are a few tools you really need to have. Others might not be absolute musts, but we’ll get to those in a bit. For now, let’s look at the stuff you’ll definitely want.
A Work Stand

If you’ve ever tried working on your bike while it’s on the ground, you know what an absolute pain that can be. To properly work on your rig, you need the proper setup. You need it to be at eye-level, stable, and able to spin freely. For that, you need a work stand.
There’s a slew of stands available at varying price points. And, like with most things, you get what you pay for. Here are a few you might want to check out:
- Bikehand Pro Mechanic Stand: If you’re just getting started, you can opt for something affordable like this. It should cover all your basic needs, although cheaper stands aren’t stable with heavier bikes. If your bike weighs more than 25 pounds or so, this might not be the best choice.
- Park Tool PSC-9 Home Mechanic Stand: Park Tool is one of the top names in bike repair, and its products are always top-notch. This is the most basic repair stand it makes, though. You have to shell out a bit more to get something more robust.
- Feedback Sports Pro Elite Repair Stand: If you’re looking for a more robust stand, I can’t recommend this stand enough. It’s incredibly stable, can handle nearly any bike, and folds up to be pretty compact for easy transport. I’ve used this stand for at least three years for routine maintenance on my bikes, and it’s been rock-solid the entire time.
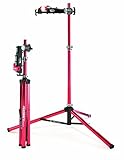
Feedback Sports Pro-Elite Repair Bike Stand (Red)
Get this excellent bike repair stand for use at home and on the road.
$324.95 ![]()
Hex Keys and Torque Wrenches

Now that you have your bike in a good position to work on, you need some tools to get the job done. Most of the parts on a bike use hex head screws, so you need a good set of hex keys to keep everything tightened. There’s a good chance you already have a set around the house you can use.
If you don’t, however, here are a few options to get you started:
- TEKTON Long Arm Hex Keys: This is about as basic as a set of hex keys gets, and it’s all you should need for most applications.
- Park Tool PH-1.2 P-Handled Hex Wrenches: If you want something more premium, the PH-1.2 is where it’s at. They’re pricey, but they feature a more robust design than a basic set. And you can use the ball end like a T-style wrench.
- Park Tool AWS-3 3-Way Hex Wrench: For the most basic of tasks, it’s helpful to have a simple three-way hex wrench around, as well. The ergonomic grip makes it faster and easier to use than a regular hex key. This is my go-to wrench for common tweaks to areas like the stem and seat post binder. Note there are two versions of the AWS-3: one with smaller 2, 2.5, and 3 heads; and one with later 4, 5, and 6 sizes. You want the latter for most tasks.
I also recommend investing in a torque wrench. Nearly every bolt on a bicycle has a torque rating (that is, how tight each bolt should be cranked down). If you miss that sweet spot, it could be detrimental to both the components and you. If you don’t torque it down enough, you risk slippage; get it too tight, and you risk damaging crucial components or expensive parts.
The most common parts of a bike you need to tweak are the bars and seat post clamp, both of which usually carry torque ratings of 4-6 Nm (Newton Meters). The good news is there are plenty of wrenches out there that cover that full range:
- Park Tool ATD-1 Adjustable Torque Driver: This adjustable wrench works in half-Nm increments between 4-6, so it’s pretty versatile and covers many of the smaller bolts on a bike. It also comes with three different bits, so it’s useful in a variety of places.
- Pro Bike Tool Adjustable Torque Wrench: This wrench is not as adjustable as the Park Tool model with options for 4, 5, and 6 (not half-Nm options), but it should do the trick in most cases.
- Vibrelli Bike Torque Wrench Set: This is a micro-adjustable wrench set ranges between 2-20 Nm. That’s a super versatile wrench for about the same price as Park Tool’s basic model. Keep in mind it’s a much bigger wrench, though, so it won’t work as well in tighter spaces.

TEKTON Hex Key Wrench Set, 13-Piece (1.27-10 mm) | 25242
Have a hex key for any situation.
$13.00 ![]()
A Good Tape Measure

If you’re changing components like handlebars, stem, seat post, or saddle, you’re going to need to take some basic measurements to ensure you get the new stuff properly positioned. For that, you need a good tape measure. When dealing with bikes, most things are measured using the metric system because it’s simply more accurate than Imperial (and it generally makes more sense).
- Komelon 4912IM The Professional Scale Power Tape: This 12-foot, 3.5-meter tape measures both imperial and metric. It costs less than ten bucks and does what you need it to. What else can you say about a tape measure?
- Park Tool RR-12C Tape Measure: If you want all your tools to match, you can go with this one. It also measures stuff.
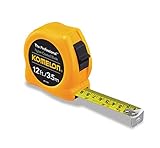
Komelon 4912IM The Professional 12-Foot Inch/Metric Scale Power Tape, Yellow
Get your measurements right with this metric/imperial tape.
$7.27 ![]()
A Pump

Your bike has tires. Tires need air. So, you need a pump. Seriously though, you need to check your tire pressure before every ride. I know that seems excessive, but high-pressure tires (like road bike tires) lose air faster than something like car tires. There are a lot of variables here, but ultimately, checking tire pressure before every ride helps prevent pinch flats. As for what pressure you should run, well, that’s an entirely different conversation.
For most home applications, a regular old floor pump is all you need. Here are a few I’ve had good luck with:
- Topeak Joe Blow Max: I’ve had this pump for several years now, and it’s still going strong. It’s still my go-to pump for checking tire pressure on the regular.
- BEELORD Aluminum Bike Pump: If you want the most accurate reading possible, this digital pump from BEELORD is worth considering. It’s digital gauge lets you know the exact pressure of your bike’s tires, no guessing.

Topeak JoeBlow Max HP Bike Floor Pump, 160 PSI/11 BAR, TwinHead
Get the pump that's in for as many miles as you are.
$49.95 ![]()
More Necessities: Lubes, Degreaser, and Bike Wash
Now that you have all your tools let’s talk about disposable maintenance items—lubes, washes, degreasers, and all that good stuff!
Proper bike maintenance doesn’t just mean tightening bolts every once in a while—it means actually cleaning that thing, too! The drivetrain (that is, the chain, the gears, chainrings, and cranks) need special attention, which includes both lubing and degreasing regularly.
Chain Lubes

If you’ve been using WD-40 to lube your chain, stop. Keep the WD-40 away from your bike. Permanently. You need real chain lube.
Why? Because WD-40 isn’t even lube, it’s more of a degreaser (and not even a good one), which is kind of the opposite of lube. When it comes to chain lube, there are two main types: wet and dry. Now, stay with me here, as this may get a little confusing. Wet lube is made for wet conditions, while dry lube is used in dry, dusty conditions. Wild, right?
Unless you live in a very wet environment—you know, where it rains more often than not—then you probably need a dry lube. The good news is there are tons of choices. Here are a few of my favorites:
- WD-40 Wet Lube: Yep, WD-40 has a line of bike lubes, and they’re great.
- WD-40 Dry Lube: It also comes in dry!
- Rock N Roll Gold: This has been my go-to chain lube for years. It’s a great balance between dry and wet, as it’s made for use in all conditions (except the most extreme).
- Rock N Roll Absolute Dry: One of the “fastest” lubes available, meaning it offers less resistance than any other. The problem? It wears off quickly, so you have to replace it more often.
- Rock N Roll Extreme: This is Rock N Roll’s wet lube. It’s really designed for extreme conditions. So, like, if you plan on riding during a monsoon, you want this.
While we’re talking about lubes, you might be wondering how often you should apply said lube. The general rule is about once every 100 miles or so, but immediately after any wet ride. That should extend the life of your chain.

WD-40 Specialist Bike Wet Chain Lube, 4 OZ
Keep your chains lubed with the right type of WD-40!
$9.38 ![]()
Degreasers

For good chain maintenance, you also need to degrease that thing once in a while (every 500 miles is the recommendation). For that, you need a good degreaser. There are two different styles of degreaser: aerosol and pour-types. The former comes in a pressurized aerosol can—you know, like paint or hairspray—while the latter is just an open can that you pour directly onto a rag.
Here’s a look at some of the best options available now:
- WD-40 Bike Chain Degreaser: Remember how I said WD-40 is more of a degreaser than a lube? Well, even then it’s a pretty shoddy degreaser. That’s why WD-40 also makes a product specifically for bike chains.
- White Lightning Clean Streak: This is another aerosol degreaser, much like WD-40’s offering. I’ve used this for years and have nothing but good things to say about it.
- Muc-Off Pink Bio Degreaser: Muc-Off makes some of the best bike cleaning products in the game, but they come at a premium price compared to similar products. Still, if you want the best, this is probably it.
- Finish Line Citrus Degreaser Pour Can: This is probably my favorite pourable degreaser on the market. And it works perfectly with another must-have tool: a chain cleaner.
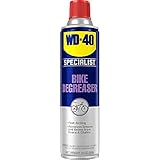
WD-40 Specialist Bike Degreaser , 10 OZ
Decrease your grease at the end of your ride with this chain degreaser.
$6.99 ![]()
$8.00 Save 13%
A Chain Cleaning Tool

While aerosol degreasers are great for quickly spraying down the chain and cleaning it off, there’s a better way—a chain cleaner. You load this thing up with degreaser, put it on the chain, and then spin the crank backward. It completely degreases the chain quickly and easily, saving you lots of time and hassle. It’s great—and cheap!
Here are my picks for the best chain cleaning tools out there right now:
- Park Tool CG-2.4 Bicycle Chain and Drivetrain Cleaning Kit: Expect a lot of milage out of this robust chain cleaner. Park makes stuff for the long haul.
- Pedro’s Chainpig II Chain Cleaner: A trusted name in all things bike repair, so this is a good one. Plus, it looks like a pig, and that’s just cool.
- Finish Line Shop Quality Bicycle Chain Cleaner: Another quality option. This chain cleaner kit features a three-brush design to clean your chain in less than a minute.
Remember, if you get one of these, you need a good pour degreaser (instead of an aerosol) to go with it.
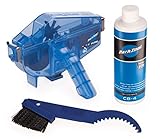
Park Tool Unisex's CG-2.4 - Chain Gang Cleaning System Chaingang, Blue, one
Keep the most important aspect of your bike clean with this kit.
$39.95 ![]()
$57.95 Save 31%
Bike Wash

Finally, you need a way to keep the rest of your bike clean. While you could just hose it down and use a bit of dish soap to clean it, a dedicated bike wash is better. Check it:
- WD-40 All-Purpose Bike Wash: WD-40 is all in on the bike care scene, and this wash is fantastic. I’ve been using it for a while, and it cuts through grease, grime, and road debris to keep my bikes looking great. Plus, it’s cheap!
- Finish Line Super Bike Wash: I used this stuff for years, and it does the job.
- Muc-Off Nano Tech Bike Cleaner: As I said earlier, Muc-Off makes some of the best stuff in the game, and this Nano Tech cleaner is where it’s at for high-quality cleaners.

General Greases and Lubricants

While the drivetrain is often the part of the bike that you need to routinely lube, it’s also good to have some general grease on hand. Any time you change components, you can re-grease all the bolts when you put them back in place to keep them from seizing up in the future. For example, if you change the handlebars, you should grease the stem bolts when you replace them.
Note: These are not the same as the lubes for the chain. You can’t use these on the drivetrain.
Here are my recs for general grease:
- Park Tool PPL-1 PolyLube: Park Tool’s go-to grease for the bike. I’ve been using it for years and haven’t had an issue. Everything from stem bolts to seat post and pedals get this grease.
- Finish Line Premium Grease: If you’re not cool with Park Tool stuff, Finish Line also makes some good grease.
Aside from general greases like the above, it’s also good to have a little bottle of oil—again, not for the drivetrain—but for parts that might stick occasionally. For that, there’s one brand I find stands above the rest:
- Tri-Flow Superior Lubricant: For anything stuck or displaying the least bit of resistance (like cables), Tri-Flow is my jam. And a little bit goes a long way, so one bottle might last you the rest of your life.

Park Tool PPL-1 Polylube 1000 Grease Tube (4 oz)
Having a little extra grease on hand is always a good idea.
$8.60 ![]()
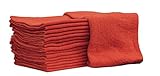
Rags and Gloves

To clean and degrease the drivetrain, to clean your bike, and even to wipe your hands off in-between, you’re going to need rags. Bikes are dirty, y’all.
I picked up a pack of 25 from Amazon, and they’ve been fine, for the most part. They seem to shed more than I’d like at times, but otherwise, they’re okay. I’m shocked at how hard it is to find good rags that don’t cost a ton. It’s weird.
Grease can get down into your skin and be pretty difficult to clean off, so unless you want your hands to look perpetually dirty, I’d also suggest some good mechanic’s gloves. I use these black 6 mil disposable gloves from AMMEX for the dirtiest of jobs and highly recommend them. I will continue to buy these.
I also have a set of reusable mechanic gloves from Finish Line that I use for quick jobs. They’re great to have on hand (heh), so I don’t waste the AMMEX gloves for something that’s only going to take a couple of minutes (like changing wheelsets).
I know, this seems like a lot of stuff. And it kind of is! But hey—you bought yourself a nice bike, now you have to take care of it. If like me, you find yourself enjoying the maintenance aspect of bike ownership, there are few more tools you might want to add to your arsenal. If you want to keep it simple and pay the mechanic at your local bike shop to handle the dirty work, you can probably skip the next section.
Nabob Wipers Auto Mechanic Shop Towels 25 Pack Shop Rags 100% Cotton Size 14"x14" Commercial Grade (25 Pack, Red)
Never be without a fresh towel.
$13.99 ![]()
The Niche Stuff That Comes in Handy

If you made it this far, congratulations. This is a lot of words about bike tools! Alas, I apologize for nothing, as I want to make sure you know what’s up. Still, I’ll keep this section as short and sweet as possible.
Here are some of my favorite tools to have outside the absolute musts:
- A pedal wrench: I have the Park Tool PW-5, and it has removed/installed many a pedal on many a bike.
- Chain whip: If you ever need to take the cassette (the gears on the back) off your bike, then you’ll need a chain whip. You can keep it cheap and get this one from Amazon (it even comes with a cassette removal tool).
- Cassette tool: If you opt for a Vice Whip instead of a traditional chain whip, then you also need a cassette lockring tool. This one from BW Bicycles should do the job.
- Disc brake tools: More and more bikes are coming with disc brakes (as opposed to the traditional rim brakes), so you might want to be able to take care of those, if necessary. If the rotor gets warped, a truing fork helps you get it back in order. I like this one from Feedback Sports. If you’re having a hard time getting the rotor centered, the Birzman Clam Disc Brake Gap Tool is a lifesaver. And you get not one, not two, but three—what a deal!

Park Tool PW-5 Home Mechanic Pedal Wrench
You never know when a pedal wrench will come in handy
$17.95 ![]()
So, there you go. This is by no means an exhaustive list of every tool you need to do everything you might want to your bike. That’s a different beast altogether—especially when it comes to proprietary components (which some bike manufacturers seem to love). But this list should be good enough to get you started taking care of most bike basics on your own.


